Are you a photography fan who wants to be an artist? This Photoshop tutorial will show you how to make your favorite photos look like digital paintings. You’ll learn about Photoshop filters and techniques to get unique, hand-painted effects. Your friends and family will be amazed.
Whether you’re new to Photoshop or have experience, this guide will help you. You’ll see how to turn your photos into beautiful, unique artworks.
Key Takeaways
- Learn how to use Photoshop’s powerful filters and tools to turn photos into paintings
- Discover techniques for matching colors from a painting reference and applying pixelation and oil paint effects
- Explore ways to make final adjustments and enhance your digital paintings for the perfect artistic touch
- Unleash your creativity and turn your photos into unique, hand-painted masterpieces
- Gain the skills to create beautiful digital art from your favorite images
Introduction to Transforming Photos into Artistic Masterpieces
Photoshop is a powerful tool for photographers and artists. It lets you use filters, layers, and tools to make photos into photoshop for artistic expression. This article will show you how to turn photos into amazing digital artworks.
The Power of Photoshop for Artistic Expression
Photoshop is more than just photo editing. It lets you try out digital art creation techniques. You can add textures, colors, and effects to your photos. With Photoshop, you can make your photos into unique digital paintings.
Overview of the Photo-to-Painting Transformation Process
Turning a photo into art is a journey. It involves planning, trying new things, and adding creativity. We’ll guide you through this process to make your own digital artworks.
| Course Title | Instructor | Online Tools | Skill Level |
|---|---|---|---|
| “From Photo To Fine Art: Simple Painterly Editing Techniques” | Beth Mancuso | Photoshop or editing apps on an iPad | Beginner to Intermediate |
The course teaches many photo editing for artistic effects. You’ll learn:
- Painterly Editing Techniques
- Enhancing Images with AI
- Using Photoshop Overlays and Actions
- Adding Brushes and Textures for Depth
- Creating Weather Effects like rain or fog
It also shows how to turn still images into digital art creation through motion and animation.
Beth Mancuso, the instructor, is a renowned photographer. Her work has been featured by National Geographic, Sony, and ABC News. With her help, you’ll learn to use Photoshop to create amazing photo-to-painting transformations.
“93% of tutorials on the Photoshop training site are rated with five stars, showcasing the exceptional quality of the content and the positive impact it has on users.”
Start your journey of photo-to-painting transformation. Learn to turn your photos into unique digital artworks. Get ready to explore Photoshop’s endless possibilities and improve your photoshop for artistic expression.
Gathering Necessary Resources
Before starting your digital painting, you need a few key things. First, pick a high-quality photo to base your artwork on. The photo’s quality is crucial for the final look. Choose one with lots of pixels and no noise or compression issues.
Next, find a painting that inspires you. This painting will guide your color choices, brushstrokes, and overall style. It helps blend the photo and painting elements smoothly.
Selecting a High-Resolution Photo
For the best photo, go for high resolution. Aim for at least 300 dpi or 3000 x 2000 pixels. This ensures your artwork will be detailed and clear. Spend time finding the right photo, keeping the high-resolution photo in mind.
Choosing an Inspirational Painting Reference
Choose a painting that matches your artistic vision. This painting reference should match your desired style and colors. Look through art galleries or your favorites to find the right one. This art inspiration will guide you in Photoshop.
With a great photo and painting reference, you’re ready for a successful transformation. Your final artwork will be both beautiful and artistically rich.
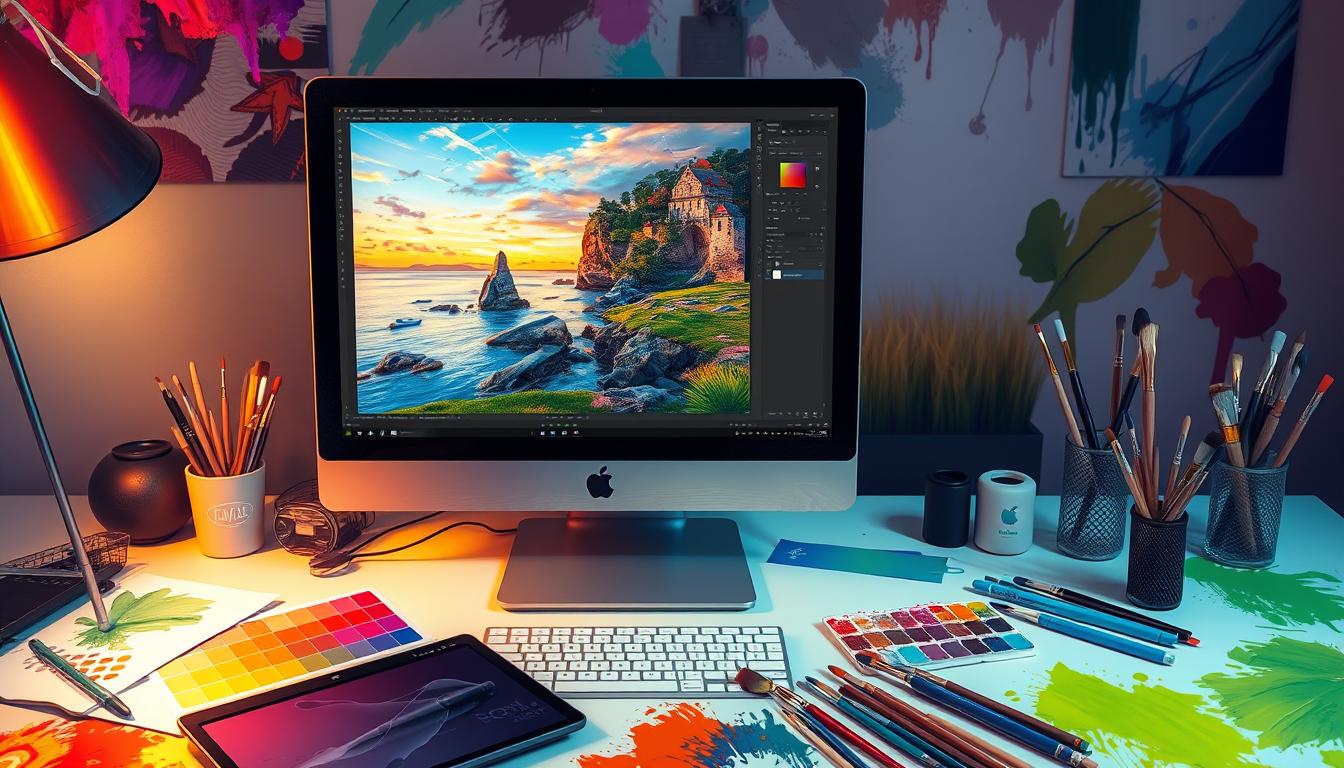
Preparing Images in Photoshop
Starting your photo-to-painting journey begins with preparing your images in Photoshop. Open the photo you want to transform and the painting reference that inspires you. This step is key.
Photoshop will show these images in separate windows. This makes it easy to switch between them as you work. It’s a crucial part of the photoshop image preparation process.
Creating New Layers for Effects
Now, it’s time to start your digital masterpiece. Create new layers in your photo file for the layering for effects you’ll use. This way, you can easily try out different things and refine your photo and painting reference until it’s just right.
- Use layers to manage different parts of your picture, like the background, subject, and details.
- Try out blending modes, layer styles, and opacity to mix the elements smoothly.
- Keep your layers organized and easy to find. This makes it simpler to make changes.
By properly preparing your images and setting up your workspace, you’re ready for a smooth photo-to-painting transformation.
Applying the Pixelation Effect
To start making your photo look like a painting, first apply a pixelation effect. This method makes your image look like it was painted with brushstrokes. It breaks your photo into small squares, giving it a unique, artistic feel.
Matching Colors from the Painting Reference
After applying the pixelation effect, match your photo’s colors with your painting reference. This step is key to a cohesive look. Analyze the colors in your reference and adjust your photo’s colors to match.
Adding Pointillize Filter for Painterly Texture
To make your image look even more like a painting, use the Pointillize filter in Photoshop. It turns your image into dots, like pointillist art. Play with the filter settings to get the right texture and look.
![]()
“The ability to transform a simple photograph into a stunning, one-of-a-kind painting is truly a testament to the power of Photoshop and the creative possibilities it offers.”
Learning these techniques opens up a world of artistic possibilities. You can turn simple photos into stunning, painterly works of art. Use the pixelation effect, match colors, and apply the pointillize filter to bring your painting reference to life. Your creations will surely impress.
How to Turn a Photo Into a Beautiful Painting in Photoshop (Tutorial)
Unleash your inner artist and transform your ordinary photos into breathtaking digital paintings with this step-by-step Photoshop tutorial. Whether you’re a beginner or a seasoned digital artist, you’ll discover the power of Photoshop’s tools and filters. These tools help create stunning photo-to-painting conversions that will impress your friends and followers.
To get started, you’ll need a high-resolution photograph with interesting details and textures. Consider capturing wildlife, portraits, or landscapes that have a unique character. Once you have your photo, it’s time to dive into the world of digital art creation.
- Open your photo in Photoshop and create a new layer above it.
- Apply the Pixelate effect to the new layer, adjusting the settings to achieve your desired level of pixelation.
- Use the Eyedropper tool to sample colors from a reference painting, then apply those colors to your pixelated layer using the Brush tool.
- Add a Pointillize filter to the layer to create a more painterly texture, experimenting with the settings until you’re satisfied with the result.
Next, let’s enhance your creation with the Oil Paint filter:
- Duplicate your layer and apply the Oil Paint filter, adjusting the settings to your liking.
- Experiment with the Brush, Texture, and Cleanliness settings to achieve your desired painting effect.
- Use Layer Masks to selectively apply the Oil Paint filter to specific areas of your image, allowing for more control over the final result.
Finally, make any necessary finishing touches:
- Use the Auto Tone, Contrast, and Color adjustment tools to fine-tune your image.
- Adjust the Saturation level to enhance the vibrancy of your digital painting.
By following this photo to painting tutorial, you’ll unlock the potential of Photoshop’s digital art creation tools. Transform your photos into stunning photoshop painting transformations. Get ready to impress with your new-found step-by-step guide to turning photos into beautiful paintings in Photoshop.
| Software | Advantages | Disadvantages |
|---|---|---|
| GMX PhotoPainter | Cost-effective, easy to use | Limited features compared to professional software |
| Corel Painter | Advanced features, high-quality results | More expensive than consumer-level options |
“Transforming photos into digital paintings is a captivating and rewarding process. With the right tools and techniques, you can unleash your creative potential and bring your images to life in unexpected ways.”
Enhancing with Oil Paint Filter
Photoshop’s Oil Paint filter can make your photo look like a painting. It mimics oil paint’s brushstrokes and texture. This adds depth and makes your digital art feel real.
Adjusting Filter Settings for Desired Effect
Play with the Oil Paint filter’s sliders to get the look you want. Try Stylization, Cleanliness, and Bristle Detail to fine-tune your oil painting effect. This lets you bring your vision to life.
Adjusting these settings blends oil paint-style brushwork with your photo. This creates a mix of realism and artistic flair.
- The Stylization slider lets you choose from abstract to realistic oil painting effects.
- The Cleanliness slider changes the brushstroke blending, from smooth to textured.
- The Bristle Detail slider adds or reduces brush bristle details, enhancing the painting’s character.
Try different settings to find the perfect mix for your photo and artistic vision.

“The Oil Paint filter in Photoshop is a game-changer, allowing me to transform my photographs into genuine-looking oil paintings with just a few clicks. The level of customization is truly remarkable.”
Learning the Oil Paint filter opens up new ways to enhance your digital images. You can turn them into stunning, artistically-inspired pieces.
Final Touches and Adjustments
Now it’s time to add the final touches to your photo. Use Photoshop’s auto-adjustment tools to make it look like a painting. The auto tone, contrast, and color commands can adjust brightness, contrast, and color balance for you.
Enhancing with Auto Tone, Contrast, and Color
Start by going to the Image menu in Photoshop. Choose Auto Tone, Auto Contrast, and Auto Color. These tools will make quick, yet effective changes to your image. They help bring out the best in your painting-like image finalization.
Adjusting Saturation for Desired Vibrancy
After optimizing the auto tone contrast color, adjust the saturation for more vibrancy. Changing the saturation adds depth and richness. This ensures your digital painting captures the essence you wanted.
Remember, finding the right balance is key in final photoshop adjustments. Try different settings and tools until you’re happy with the result. Your final image should be stunning, leaving everyone in awe.
Exploration and Experimentation
Turning photos into stunning digital paintings in Photoshop is a creative journey. It’s a chance to try new things and find your style. You’ll learn and grow with each step.
Photoshop has many tools for photoshop painting exploration, creative photo editing, and artistic experimentation. Feel free to mix and match to find your unique digital art discovery.
- Try different Photoshop blending modes to mix your images in new ways.
- Change layer opacity to show the base image and add depth.
- Use layer masks to refine your work, highlight key points, and blend elements smoothly.
- Check out Nik Analog Efex Pro 2 for vintage effects and a unique look.
“The true voyage of discovery consists not in seeking new landscapes, but in having new eyes.” – Marcel Proust
The journey of turning photos into paintings is about exploration and experimentation. It’s okay to try new things and learn from them. Share your work and let it inspire you to create more amazing digital art discovery.
Showcasing Your Artistic Creations
Congratulations on mastering the art of turning photos into captivating paintings in Photoshop! Now it’s time to show off your work. Whether it’s a simple snapshot turned into an impressionist masterpiece or a cherished portrait brought to life, your creations are worth sharing.
Sharing Your Photoshop Painting Transformations
Think about sharing your Photoshop paintings on social media. This way, you can connect with other artists and fans. Join online artist communities for support and feedback on your digital artworks. Or, create your own online portfolio to showcase your Photoshop paintings and attract new opportunities.
Sharing your creative journey and final results can inspire others and help you grow. Don’t be afraid to try new things and explore Photoshop’s limits. Your unique digital artworks can captivate and inspire the artist community.
“The true essence of art is not what you see, but what you make others see.” – Edgar Degas
So, start showing off your Photoshop painting masterpieces and let your creativity shine. Who knows, your transformed images might lead to exciting new opportunities or collaborations within the artist community.
Advanced Techniques and Resources
As you get better at Photoshop, explore advanced techniques and resources. Look into the many tools and filters in Photoshop. Try different ones to get unique artistic effects.
Exploring Additional Photoshop Tools and Filters
Digital painting tools and software let artists without a painting background create. Photo editing software like Photoshop is key for basic edits like cropping and adjusting brightness. Apps like Procreate are loved for their easy-to-use interfaces and smooth drawing.
AI technologies have made big leaps in art creation, especially in style transfer techniques. Filters like oil paint and watercolor help turn photos into digital paintings. Digital tools make art-making accessible to everyone, whether you’re a pro or just starting out.
Learning from Photoshop Painting Tutorials
Also, look for online tutorials and educational resources from skilled digital artists and Photoshop experts. Keep learning and exploring to improve your Photoshop painting skills. This will open up a world of creative possibilities.
Getting the details right, like color and texture, is key for better digital paintings. You can make precise adjustments using sliders and controls. There are over 100 free advanced Photoshop tutorials online, covering many techniques and effects.
“The power of Photoshop for artistic expression is truly limitless. With the right tools and resources, anyone can unleash their creative potential and transform ordinary photos into stunning digital masterpieces.”
Conclusion
In this guide, you’ve learned to turn photos into stunning paintings with Photoshop. You’ve discovered techniques like color matching and pixelation. You’ve also learned how to use the Oil Paint filter and make final touches.
Remember, the fun is in exploring and trying new things. This is how you find your own unique style. It’s all about discovering your creative voice.
Now, you can keep improving and show off your work. The world of artistic expression is vast. Let your imagination run wild. Whether you’re a pro photographer or just starting, this guide will help you create amazing paintings from photos.
Keep these tips in mind as you continue: use high-quality images, explore Photoshop’s tools, and be patient. With these tips, you’ll master Photoshop painting and create stunning art.
FAQ
What is the process of turning photos into paintings in Photoshop?
To turn photos into paintings in Photoshop, start by picking a high-quality photo. Then, choose a painting that inspires you. Next, use Photoshop’s tools to add pixelation and oil paint effects. Finally, make any last adjustments to get the painting look you want.
What resources do I need to transform my photos into digital paintings?
You’ll need a good photo to start with. Also, find a painting that inspires you. And, of course, you’ll need Photoshop to use its tools and filters to transform your photo into a painting.
How do I match colors from a painting reference to my photo in Photoshop?
Open both your photo and the painting reference in Photoshop. Look at the colors and use the Eyedropper to match them. This way, your photo will look like a painting.
What Photoshop filters or effects can I use to create a pixelated, painterly texture?
The Pointillize filter is perfect for adding a textured look to your photo. It makes your photo look like a painting with pointillist-style brushstrokes.
How can I use the Oil Paint filter in Photoshop to enhance the painting-like look of my transformed image?
The Oil Paint filter in Photoshop mimics oil paint. You can adjust settings like Stylization and Bristle Detail to get the look you want. This lets you customize your painting effect.
What final adjustments can I make in Photoshop to perfect the painting-like appearance of my transformed image?
Use Photoshop’s Auto Tone and Auto Contrast to improve your image. You can also adjust the saturation to make your painting more vibrant. This helps you achieve the artistic look you’re going for.
How can I showcase my Photoshop painting transformations and connect with the digital art community?
Share your work on social media or online art communities. You can also create a digital portfolio. Connecting with others in the digital art world can inspire you and open up new opportunities.
Related posts:

Resources:
Explore our curated list of recommended resources for printing, design, and free media assets. Whether you need professional printing services, free design templates, or royalty-free photos for your next project, these reliable sites have you covered.1. Printing & Design
- Printing Inc. Description: Singapore-based online printing service offering a variety of print products such as business cards, flyers, brochures, and custom stickers with professional design services.
- Namecards Inc. Description: Specialist in name card printing, providing a wide range of custom designs, finishes, and materials for high-quality business cards.
- Kian Hong Press Description: Established corporate printing company in Singapore, offering solutions for brochures, catalogs, annual reports, and other corporate stationery.
2. Free Design Templates
- Canva Description: Offers a wide range of free and customizable templates for various needs, including presentations, posters, social media, and marketing materials.
- FreePik Description: Provides thousands of free and premium templates for brochures, flyers, business cards, and more, along with editable vector illustrations and graphics.
- Piktochart Description: Focused on data visualization and professional templates for infographics, posters, presentations, and reports, with both free and premium options.
3. Free Royalty-Free Photos
- Pexels Description: Offers high-quality, free stock photos and videos shared by talented creators for commercial and personal use without attribution.
- Unsplash Description: A large collection of beautiful, high-resolution images contributed by photographers worldwide, available for free use in any project.
- Pixabay Description: A community-driven platform offering copyright-free photos, illustrations, and videos for use in any creative project, with no licensing restrictions.