Make your designs pop with stunning emboss and deboss effects. This detailed Photoshop tutorial will show you how to create 3D text and depth effects. These effects look just like real printed designs.
Whether you’re making marketing materials, logos, or other visual projects, this tutorial has you covered. You’ll learn how to add a professional touch that makes your work stand out.
Key Takeaways
- Master the techniques to create realistic embossed and debossed effects in Photoshop
- Understand the importance of using layer styles and adjusting bevel and emboss settings
- Learn how to add depth and dimension to your designs with inner shadows and gradient overlays
- Discover ways to match materials and lighting for a truly authentic look
- Explore advanced techniques to take your embossing and debossing skills to the next level
Introduction to Embossing and Debossing Effects
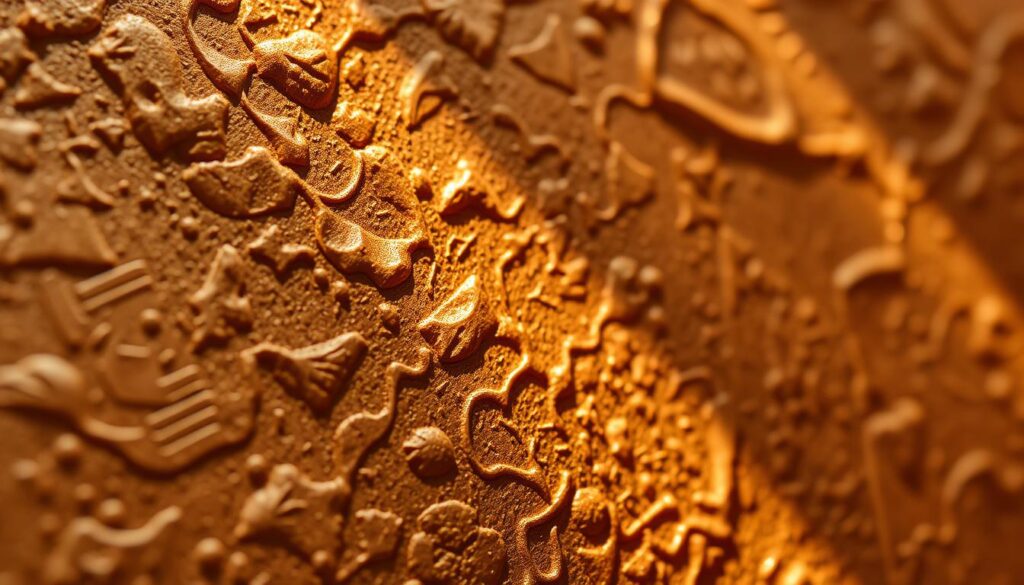
Embossing and debossing are amazing print design techniques. They add a unique, touchable quality that digital media can’t match. This guide will show you how to get that same amazing look in Photoshop. You’ll learn to use these techniques in your digital work for a top-notch look.
The Uniqueness of Embossed and Debossed Designs
Embossing makes an image or text stand out by raising it on a surface. Debossing, on the other hand, creates a sunken effect. Both use heat, pressure, and metal plates to make print products stand out.
Embossing can be done on both sides of a material, making it great for business cards. Debossing is cheaper because it only needs one plate. Both can make products like brochures and packaging look more valuable.
This tutorial will show you how to bring texture and depth in design to your online projects. You’ll learn to make realistic embossing and debossing effects in Photoshop. It’s all about making the virtual and physical emboss/deboss experiences work together seamlessly.

Creating an Embossed Effect Step-by-Step
Making your designs pop with an embossed effect is simpler than you think. We’ll show you how to make a three-dimensional embossed look in Photoshop. You’ll end up with a design that looks like it’s pressed into the surface.
Setting Up the Background and Artwork Layers
Begin by making a new Photoshop document. Use dimensions of 700×400 pixels and a resolution of 72 pixels per inch. This size is great for web designs and keeps your files small.
Then, add a textured background layer. Choose a subtle pattern or a texture that looks like natural materials. Adjust its opacity to match your embossed elements.
Create a new layer for your text, logo, or artwork. Pick a font, size, and style that fits your design’s look.
Applying Layer Styles for the Embossed Look
Now, it’s time to add the embossed effect. Go to the Layers panel and double-click on your artwork layer. This opens the Layer Style dialog box, where you can choose your embossed look.
- Choose the “Bevel and Emboss” layer style. It lets you set the depth, direction, and sharpness of your embossed look.
- Adjust the “Depth” and “Size” sliders to change the embossed effect’s height and intensity. A depth of 10-20 pixels and a size of 5-10 pixels works well for a subtle look.
- Play with the “Angle” and “Altitude” settings to control the embossed design’s direction and light source.
- Try the “Contour” and “Texture” options to add more detail and realism to your embossed look.
By tweaking these layer style settings, you can create a 3D text effect in Photoshop. It will blend well with your background and add depth. Feel free to experiment to find the perfect embossed effect for your design.

Creating a Debossed Effect Step-by-Step
In this section, we’ll learn how to make a debossed effect in Photoshop. Debossing makes the design look like it’s pressed into the surface. This gives it a three-dimensional look. To get this effect, we need to match the material and texture of the background with the design. We also need to use the right layer styles and adjustments.
Matching Materials for a Realistic Debossed Look
The secret to a great debossed effect is blending the artwork with the surface. Start by picking a background texture or material that fits your design. This could be paper, fabric, or leather. Try different options to find the best match.
- Find the right background texture or material that matches your design.
- Adjust the background layer’s opacity and blending modes for a smooth mix with the debossed artwork.
- Use layer masks and selective blending to make the edges and transitions look sharp.
By matching materials and textures, you can make the debossed effect look like it’s pressed into the surface. This adds depth and dimension to your design.
“The devil is in the details when it comes to creating a realistic debossed effect. Pay close attention to the material textures and how they interact with the indented artwork.”
The aim is to blend the debossed element with the background seamlessly. It should look like it’s been pressed into the surface. With the right material matching and Photoshop skills, you can get a stunning, three-dimensional effect.
Adjusting Bevel and Emboss Settings
To get realistic embossed and debossed effects in Photoshop, you need to tweak the bevel and emboss settings. These settings help control the depth, shading, and other details for a real look. Learning to customizing emboss/deboss effects and fine-tuning 3D text effects can make your designs stand out.
The Photoshop bevel and emboss settings have two main parts: Structure and Shading. Structure includes Style, Technique, Depth, Direction, Size, and Soften. Shading has Angle, Altitude, Gloss Contour, Highlight Mode, and Shadow Mode.
Playing with these settings can greatly change how your embossed or debossed elements look. For instance, changing the Depth setting can make the impression look deeper or shallower. The Angle and Altitude settings control the light source’s direction and strength.
Also, the Contour settings in Photoshop’s Bevel & Emboss let you choose the bevel’s shape. You can adjust Anti-aliasing and Range. The Texture settings allow you to pick a pattern, adjust its scale, depth, and invert it with the text layer.
By customizing the emboss/deboss effects and fine-tuning the 3D text effects, you can create stunning, realistic designs. These skills will make your work unique and impressive.
“The depth of an emboss die can affect the final piece, with a higher chance of paper tearing as the depth increases.”
Knowing the details of Photoshop bevel and emboss settings is key for amazing embossed and debossed effects. By adjusting these settings, you can perfect your designs’ depth, shading, and texture. This will take your work to new heights of realism and professionalism.
Adding Depth with Inner Shadows
Inner shadows can make your embossed and debossed designs look even more 3D. This technique adds depth, making your text or graphics seem like they’re really raised or sunk into the surface.
Enhancing the 3D Effect with Inner Shadows
To add inner shadows and boost the 3D look, follow these steps:
- Select the layer with your embossed or debossed artwork.
- In the Layer Styles panel, find the Inner Shadow option.
- Adjust the Angle, Distance, Choke, and Size to control the shadow’s look.
- Play with the Blend Mode and Opacity to get the right depth and realism.
Finding the perfect balance between the inner shadow and emboss/deboss is key. By tweaking these settings, you can make your designs jump off the page or screen.
“Adding inner shadows is a game-changer for enhancing the realism and depth of embossed and debossed effects in Photoshop.”
Remember, using inner shadows for 3d effects, adding depth with photoshop, and enhancing emboss/deboss realism is vital. These elements help create stunning, professional designs that grab your audience’s attention. Dive into this technique to add a new dimension to your work.
Create a Realistic Emboss/Deboss Effect in Photoshop (Tutorial)
Learn how to make your designs stand out with a stunning emboss/deboss effect in Photoshop. This tutorial will show you how to do it all, from starting to finishing. It doesn’t matter if you’re new or experienced; you’ll learn how to make your text and graphics look amazing.
Our previous tutorials on emboss/deboss effects have been a hit, with 945 shares. This shows how much people want to learn these techniques. So, let’s get started and make your own realistic 3D text effects with Photoshop.
Setting the Stage: Preparing Your Photoshop Workspace
First, set up your Photoshop document with the right size and resolution. Then, create the text or graphics you want to work on. Keep your design process neat by using separate layers for each element.
Applying the Emboss Effect
- Select the layer with your text or graphics.
- Go to the Layer Styles panel and pick “Bevel and Emboss.”
- Play with the depth, size, and direction to get the embossed look you want.
- Refine the effect by tweaking the Shading, Contour, and Texture settings.
Creating a Debossed Effect
To get a realistic debossed look, follow these steps:
- Duplicate the text or graphics layer.
- Apply the “Bevel and Emboss” layer style, but choose “Deboss” this time.
- Adjust the settings to get the debossed effect you desire, thinking about depth, softness, and lighting.
Mastering these techniques will help you create amazing full emboss/deboss Photoshop tutorials. Your designs will look incredible. Keep an eye out for more advanced tips to improve your step-by-step guide even more!
Utilizing Gradient Overlays and Drop Shadows
To enhance your embossed and debossed effects, use gradient overlays and drop shadows. These Photoshop tricks add depth, highlights, and shadows. They make your designs look more real and impactful.
Gradient overlays create the illusion of depth and highlights. They mimic how light interacts with textured surfaces. This makes your emboss/deboss effects look more lifelike and professional.
Drop shadows also add depth and separation between elements and the background. This makes your Photoshop techniques stand out, increasing the realism of your designs.
In this section, we’ll show you how to use gradient overlays and drop shadows. By mastering these advanced Photoshop techniques, you’ll create stunning, 3D-like designs. These designs will impress your audience and show off your design skills.
“Gradient overlays and drop shadows are essential tools for adding depth and dimension to your embossed and debossed designs. Mastering these techniques can elevate your work to a whole new level of realism and visual impact.”
Creating a Realistic Light Source
Creating authentic embossed and debossed designs starts with mastering realistic lighting. By adjusting the light source, you can add shadows and highlights. This brings depth and dimension to your artwork.
Feathering and Adjusting the Light Source
To create a realistic light source, place your light carefully. Think about the direction and angle of the light. Feathering the light source is key – it means softening the light’s edges to blend with the surroundings.
Adjust the falloff and spread of the light for a natural look. This means making the light fade smoothly from bright to shadowy areas.
Try different intensity and color temperature of the light. A soft, warm light can look natural, while a harsh, cool light adds drama. Feathering light source in photoshop is a great way to enhance emboss/deboss depth and make your designs pop.
Mastering realistic lighting can take your embossed and debossed designs to the next level. It will captivate your audience with the illusion of texture and depth.
Matching Materials for Different Surfaces
This tutorial shows how to make embossed and debossed effects on leather. But you can use these techniques on many materials like paper, metal, and fabric. By learning to adjust your Photoshop for different materials, you can make your 3D text effects even more versatile and explore new ideas.
Working with paper, aim to capture its soft texture and flexibility. Start with a soft, watercolor background to mimic paper’s organic feel. Then, use gentle bevel and emboss settings for a delicate look.
For metal, like brushed aluminum or copper, aim for a sharp embossed effect. Make the bevel deeper and sharper to match metal’s hard, polished feel. Also, add subtle gradients and reflections to boost the metallic look.
- Adjust bevel and emboss settings to fit the material’s texture and flexibility
- Add background elements that match the surface’s unique qualities
- Try gradient overlays and drop shadows for realistic lighting and depth
Learning to match embossed and debossed effects to various surfaces opens up a world of creativity. It lets you expand your Photoshop techniques and show off your material matching for emboss/deboss skills in applying effects to various surfaces.
“The true magic of Photoshop lies in its ability to transform the ordinary into the extraordinary. By mastering the art of material matching for emboss/deboss, you can bring your designs to life and captivate your audience with stunning 3D effects.”
Advanced Techniques for Realistic Embossing and Debossing
Designers looking to improve their embossed and debossed effects will find this section helpful. It covers advanced Photoshop techniques and tips. Learn how to use layer styles, blending modes, and tools to get stunning results that impress everyone.
Using gradient overlays is a powerful technique. By mixing different gradients, you can add depth and shine to your designs. Try different colors and directions to match your style.
Adjusting the light source is another key technique. Changing the light’s intensity and position can make your designs look more real. Experiment with light angles and softness to get a natural look.
Mastering material matching can also enhance your work. Study real materials’ textures and shine, then copy them in Photoshop. This will make your designs feel real and engaging.
| Technique | Key Benefits |
|---|---|
| Gradient Overlays | Creates the illusion of depth and dimensional sheen |
| Fine-tuning Light Source | Enhances the realism of 3D text effects |
| Material Matching | Elevates the tangibility and captivation of embossed/debossed effects |
By using these expert photoshop emboss/deboss techniques, you can make your designs stand out. Elevate 3d text effects and take your designs to the next level. Be creative and achieve amazing embossed and debossed effects in Photoshop.
“The true mark of a master is the ability to take the complex and make it simple.”
Conclusion
This Photoshop tutorial has shown you how to make embossed and debossed effects look real. Now, you can make your designs stand out. You can use these skills for both print and digital projects.
Learning about embossed and debossed designs is key. You also need to fine-tune the Bevel and Emboss settings. Using inner shadows and matching materials are important too. These steps will make your designs look top-notch.
So far, 108 people have shared this tutorial on social media. It’s because making something like a presentation folder template is so useful. Keep practicing and sharing your work. You might even see your designs in a Folder Design Gallery someday.
FAQ
What is the purpose of this tutorial?
This tutorial will teach you how to make stunning emboss and deboss effects in Photoshop. These effects look almost real, just like printed designs. You’ll learn how to add these impressive 3D text effects and depth techniques to your designs.
What are embossing and debossing effects?
Embossing and debossing are print techniques that give a unique feel. They are hard to replicate online but this tutorial will show you how to do it in Photoshop.
How do I create a realistic embossed effect in Photoshop?
You’ll learn to create a realistic embossed effect in Photoshop. First, set up your background and artwork layers. Then, apply layer styles to get the 3D, raised look you want.
How do I create a realistic debossed effect in Photoshop?
You’ll also learn to create a debossed effect. This involves matching your artwork’s material to the background. Then, use the right layer styles for the pressed-in look.
How do I optimize the bevel and emboss settings for realism?
To make your embossed and debossed effects look real, adjust the bevel and emboss settings. This section will guide you on how to fine-tune depth, shading, and more for authentic looks.
How can I enhance the 3D, raised or indented look with inner shadows?
You can make your designs look even more 3D by adding inner shadows. This section will show you how to use inner shadows to deepen the material feel of your designs.
What is the step-by-step process for creating realistic embossed and debossed effects in Photoshop?
This section will guide you through creating embossed and debossed effects in Photoshop. You’ll learn how to set up layers and fine-tune details for stunning results.
How can I take my embossed and debossed effects to the next level?
To enhance your designs, use gradient overlays and drop shadows. This section will show you how to use these tools to add depth and highlights for professional-grade results.
How do I create a realistic light source for my embossed and debossed designs?
Creating a realistic light source is key for authentic designs. This section will teach you how to add a light source and feather it for convincing shadows and highlights.
Can I apply these techniques to different materials beyond leather?
Yes, these techniques work on many materials, not just leather. This section will help you adapt your Photoshop process for different substrates.
What advanced Photoshop techniques can I use for even more realistic emboss/deboss effects?
For advanced results, this section covers special Photoshop techniques. You’ll learn to use layer styles, blending modes, and tools for high-end embossed and debossed effects.